Creating and deleting Projects
If you would like to personalize multiple websites using RightMessage, you can create Projects for each individual site.
Regardless of which plan you’re on, RightMessage doesn’t limit the number of individual sites you can have in your account. You will not need to upgrade your account unless the combined unique traffic from the sites in your account exceeds the limit of the plan you’re on.
Follow the steps below to set up a new Project in RightMessage.
Create a new Project in your RightMessage admin area
Click on the "+" icon in the top left of the screen:

Then name the project and add the site's url and press the "Create Project" button.
You can quickly switch between your Projects with the dropdown menu:

Please note, your website must be a HTTPS URL in order to work with RightMessage.
In 2014 Google confirmed that websites with a strong HTTPS encryption will rank better than their HTTP counterpart and websites that have NOT switched to HTTPS are now marked as unsafe in Google Chrome.
Related reading: HTTPS: Just a Google ranking signal?
The RightMessage tracking code for each project is unique. You can use the same tracking code across multiple domains within the same project, but never use a project's tracking code on domains belonging to a different project.
How to add users to a Project
You may want to add additional team members to help you manage an account in RightMessage.
RightMessage allows you to add members (called Collaborators) for any of the accounts you set up in your RightMessage admin area.
Navigate to the Project Settings → Collaborators area in your RightMessage admin.
In the list of Add Someone New To This Project , enter their email and press the "+ Invite" button.

Your new member will receive an email inviting them to join your account.
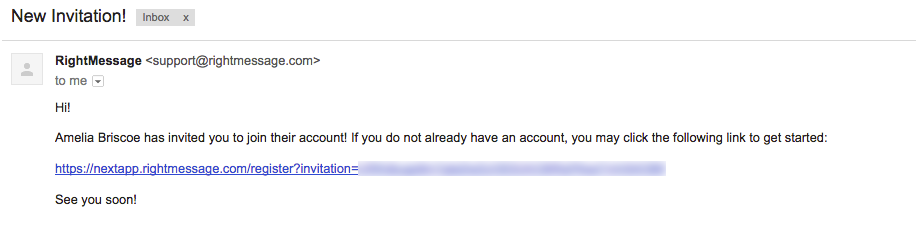
Clicking the link in the email will direct the new member to a registration screen in RightMessage with a prompt to add an email address, name and password.
When successfully submitted, the new member will be automatically logged in and redirected to the main dashboard area. The new member can now start making edits.
How to navigate between your projects

To move between different projects in RightMessage, click the toggle arrow beside the currently selected project name, and select the project you want to switch to.
Deleting a project
If you no longer want to use RightMessage with a specific website, you can delete its project.

Click on the ‘gear’ or cog icon in the bottom left of the screen and select Your profile then Owned Projects , finally click on the bin icon of the given project to delete it.
A popup message will display to advise that once deleted, all of the data for that specific Project may be removed.

Be careful when deleting a Project!
Once a project is removed, any flows, segments, goals and personalizations associated with the website for that project, may be permanently deleted and unable to be recovered.
Click Yes. Delete to continue.