Creating Personalization Campaigns
Our Website Personalization Engine gives you the power to fully personalize your entire website.
With RightMessage’s website personalization functionality, not only can you tailor and change headlines, images, links, testimonials, and more from your existing website, but you can also add dynamic data – like the information you already have about a visitor in your ESP/CRM – directly to your website.

What are Personalization Campaigns?
Personalization campaigns are a set of changes that are tied to a specific segment within a segment group.
Each of these changes, or “personalizations”, includes:
- The segment that’s triggering the change
- Details about the change (i.e. change the text to “The best way to build strength at home”)
- Where the change is happening (i.e. just your
/pricingpage) - What element(s) are being changed
We find it easiest to think about RightMessage’s personalizations as if-this-then-that:
- IF someone works in construction, THEN change the primary testimonial to be one from another construction client
- IF someone is already a customer, THEN change the navigation sitewide to remove the “Sign up” button
- IF someone came from an ad campaign targeting strength training, THEN change the hero image to be someone using a barbell
Campaigns “stack” on top of each other
Each personalization campaign you create targets a specific Segment Group. This allows you to quickly pivot around the various segments within that Segment Group and make changes.
Each campaign will “stack”. Here’s what we mean by that:
Say you have two personalization campaigns. One targets “Business Type”, and the other targets “Job role”.

Both of these campaigns have changes that target specific elements on the home page: your business type changes the headline, and the job role changes the sub headline.


When someone visits the home page who’s segmented into both an “industry” segment and a “job role” segment, both of these campaigns will run. The first will change the headline, the second will change the sub headline.
This allows you to create dozens, hundreds, or even thousands of possible variations for a particular page, or set of pages, fairly quickly. A campaign targeting 10 industry segments, another targeting 6 job roles, and a third targeting 5 primary needs leaves you with a home page with 300 possible variations!
This level of personalization gives your visitors a bespoke experience on your website that makes it more relevant to them, and thus more likely that they’ll perform key conversion actions (like filling out a lead form or purchasing.)
Many of our customers find that they’re able to get rid of chaotic portfolios of mostly similiar landing pages with RightMessage. A single, base landing page – processed on-the-fly by RightMessage’s Personalization Engine – can yield hundreds of variations that allow for your ad campaigns + ad targeting to drive people to fully personalized landing pages by segmenting via UTM parameters.
How to create a new campaign
To start, click Website → + New in the navigation.


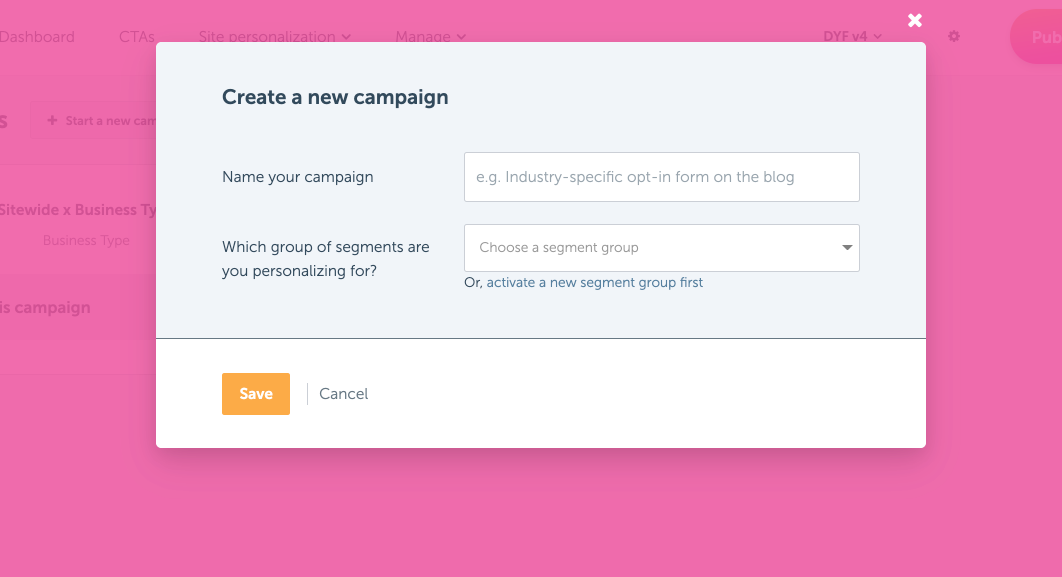
When creating a campaign, you’ll need to:
- Determine what you’ll name it. This is solely for your own categorization purposes.
- Select a Segment Groups or Questions that this campaign will use.
- Add URL to personalize: this will be the page that will serve as the base for all your personalizations. You’ll then be able to quickly pivot between the segments in that Segment Group when making changes.
Once you’re ready, click Create
While what you name a campaign doesn’t really matter, we do recommend that it reflects what’s happening in the campaign.
We recommend WHAT'S BEING CHANGED x SEGMENT GROUP , so:
- Sitewide x Industry
- Course Sales Page x Primary Need
- Paid Landing Page x Age Range
Editing an existing Personalization campaign
To edit an existing personalization campaign, open the campaign:

You can rename the campaign and enable/disable with the toggle, duplicate it and delete it with the buttons:

Targets: shows the chosen Segment Groups/Questions that will be used for the personalization.
Experiences: shows where the changes will take place.
Split tests: by default 90% of visitors are seeing the personalized experiences. The other 10% are seeing your default content.
Goals: the goals you set up for the campaign (opt-in, purchase, etc).
Remember to publish your changes!
Any changes you make in RightMessage – including adding, modifying, or deleting personalization campaigns – won’t actually go live on your website until you click “Publish to your website”.
For more information on how this all works, check out our section on publishing.
